
Getting an Arduino to play digital audio is always fun because these little 8-bit microcontroller boards were never designed for it.
In our previous audio recorder project, we tricked up the low-speed analog-to-digital converter (ADC) inside the Arduino MEGA2560 chip to record 8-bit WAV files at up to 48kHz sample rate.
However, none of these 8-bit Arduino boards have the digital-to-analog converter (DAC) circuitry to play digital audio.
Nevertheless, here, we’re pulling out the tiny Arduino Nano 3.0 to create a simple 8-bit WAV digital audio player called ‘nanoPlayer’.
Getting the code
You’ll find the source code for the project here.
Unzip the file, then copy the contents of the /libraries folder to the same of your Arduino IDE (we used version 1.6.5). Restart the IDE, load up the nanoplayer.ino file, build the project, flash the code to the Arduino nano and you should be away.
How PWM works

Pulse Width Modulation simulates analog voltages from digital outputs.
But if the Arduino Nano’s 8-bit microchip doesn’t have a built-in DAC, how can it play digital audio?
The trick lies in the functionality the little ATMEGA328P chip possesses — a feature called ‘pulse-width modulation’ (PWM).
It’s a clever process that allows a digital output to simulate an analog voltage by switching its output high and low at high speed but changing the width of the positive-going digital pulse.
If you vary or ‘modulate’ the pulse width or ‘duty cycle’ in proportion to the samples of an 8-bit digital audio file, the PWM output can give a decent averaged approximation of an analog voltage that represents those digital audio samples.
Filter the output to reduce the PWM ‘carrier’ frequency, send it off to an audio amplifier and you’ll hear the audio from that file.
Version 2.0

The Arduino Nano is a tiny version of the Arduino Uno board.
Like our digital audio recorder, the nanoPlayer is really a ‘version 2.0’ of the digital audio player we made a few years ago that featured an Arduino Uno and the Ethernet Shield.
It was inspired by an earlier simple single-button digital audio player built from a Raspberry Pi. At the time, we thought the R-Pi for that task was a bit ‘overkill’, so we built an Arduino version to do the same thing.
However, at the time, reliable SD card readers that could interface with the Arduino weren’t as common and using the Ethernet Shield gave us the best results, but a large bulky design.
Today, we’ve completely redesigned it to use a tiny Arduino Nano 3.0 plus a low-cost microSD card reader module that has built-in voltage-level translation (VLT).
Why VLT? microSD cards run on 3.3 volts while the Arduino boards typically run on 5.0-volts. Sending 5 volts to a 3.3-volt microSD card isn’t a crash-hot idea, so VLT ensures the voltage levels of the digital I/O are translated correctly and everyone’s happy.
Mini Breadboard
The other difference this time around is the use of a mini 400-point breadboard.
These things are absolutely brilliant and get my nod for inclusion in ‘brilliant inventions of the 20th century’.
The key with breadboards is that the contact points are grouped vertically in columns, broken into two halves by a gap right across the middle. The other detail is that all column points are on a 0.1-inch (2.54mm) pitch, matching DIP (dual-inline) chips.
The first integrated circuits were developed in the US, the US uses inches and they settled on 0.1-inch pitch. Although bypassed for smaller-scale surface mount tech, 0.1-inch pitch still works a treat for homebrew design.
How the player works

This MicroSD reader module for Arduino sells on eBay for $2.
First, you plug your microSD card into the reader module and power up the Arduino.
If the Arduino finds a valid microSD card, it double-flashes the LED on pin D9 and is good to go. If not, you get never-ending slow flashes.
Press the momentary-on pushbutton switch connected to pin D7 and the Arduino Nano searches for and locates the first file in the SD card’s root folder.
To turn that file into PWM output, we’re using the clever TMRpcm library by [TMRh20]. It’s fast enough to handle WAV files up to 19kHz sample-rate and 8-bit depth — not exactly ‘Hi-Fi’ but good enough for many applications.
Our code sets the library to begin decoding the WAV file and feeding it out as PWM output on pin D9.
From here, the PWM signal lights up the LED to show you the output is working. It’s then filtered by a 4.7kohm resistor and 0.0015uF capacitor, before being AC-coupled by a 0.47uF capacitor and 4.7kohm resistor to the 3.5mm output socket.
Next, you plug in a 3.5mm cable to your audio amplifier or computer speakers, turn up the volume and out comes the audio.
During playback, the pushbutton switch becomes a toggle on/off pause button.
Combine with Digital Audio Recorder

The Auduino tool installs via registry key.
Clearly 19kHz/8-bit WAV mono audio files aren’t common, but we’ve got a couple of solutions for that.
First, if you build the digital audio recorder, either the Arduino Mega version, or the original one, and set the recording sample rate to ‘19,000’, the files you record will play on the nanoPlayer.
Second, if you head to the original digital audio player project, we created a very simple converter that takes any audio file and converts it into 19kHz/8-bit WAV format through a simple right-click context menu in Windows Explorer.
Unzip the ‘auduino.zip’ file and you’ll find two registry keys — ‘InstallWavConverter.reg’ installs the converter into the registry and Windows Explorer, ‘RemoveWav Converter.reg’ removes it.
Make sure you copy the contents of the zip file to ‘c:auduino’ on your Windows computer or it won’t work. Or, you can convert files manually through Audacity.
Getting the parts
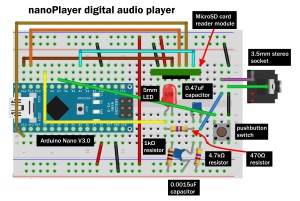 Use the overlay diagram as your build guide and you shouldn’t go too far wrong.
The Arduino Nano 3.0 board and the microSD card module were purchased from eBay. Everything else, you can get from Jaycar Electronics or Altronics.
Can it be improved?

Our Auduino tool converts files to nanoPlayer format in Windows Explorer.
The original purpose for the nanoPlayer was for a prototype single-button audio player that was easy to use and could play music or audiobooks.
We’ve used the TMRpcm library here as a quick example, but given we’ve created a digital audio recorder that can record up to 48kHz sample-rate, we’re hopeful of improving on the 19kHz WAV file support provided here over the coming months.


