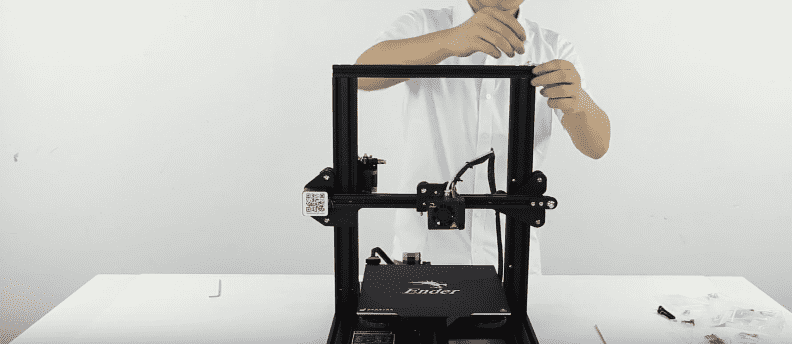
At the end of March, when the Ender 3 as announced, the anticipation of it was beyond imagination. It quickly became the most highly anticipated Creality 3D Ender 3 printer. After dominating the midrange market with the CR-10, Creality decided to focus their attention on the lower end market, and it appears that they’ll be dominating the marker again.
Not long after its release, Creality decided to upgrade the features of the Ender 3 and dropped an improved version dubbed the “Ender 3.” However, what makes this printer a pro? Are there enhanced features, or is it just a marketing scheme?
Like the Ender 3 before it, it is an affordable, well-built machine, capable of producing substantial and magnificent 3D print right from the box. Let’s take a look at some of the features, pros, and cons, as well as the unboxing.
Pros and Cons
Pros
- Quick assembly
- Heated bed
- Great printing quality
- Prints both PLA and ABS
- Inexpensive
- Large bed/print volume
Cons
- The bed wobbles so you’ll need to fix that by tightening the eccentric nuts.
- No wireless printing
- Does not come with a glass bead
- Doesn’t come with a lot of test filament
- Some control interface gripes

What’s New?
So how do you differentiate between the popular Ender 3 and the newly release Ender 3 Pro, well here are three differences between the two products?
-
Better mechanical properties

The Ender 3 has a 40×40 aluminum extrusion for its Y-axis base to make it sturdier. This would also help to increase the overall stability of the printing surface.
Additionally, it comes with better bearing wheels, which reduces friction, helps to reduce the overall noise levels, delivers more stiffness, and gives better dimensional stability.
-
Improved Extruder

In a press release, Creality said that they traded their extruder for an “MK-10” version. According to the company this trade should, “greatly reduce the risk of clogging and uneven extrusion.”
- New Magnetic Printing Surface
The final feature that sets the Ender 3 apart from the Ender 3 is the “C-MAG” magnetic printing bed it comes equipped with. The sheet is flexible and removable, meaning you can easily pull the print right off the build plate. According to Reality, this particular type of textured surface adheres to all kinds of filament better than any traditional method like glue, hairspray, or tape
Technical Specifications
Apart from the features that were improved, all the other technical specifications of the Ender 3 are the same as that of the Ender 3.

- Filament: 1.75mm
- Print volume: 220 x 220 x 250mm
- Print precision: +/- 0.1mm
- Nozzle: Single 0.4mm
- Heated bed temperature: 110?
- LCD screen: Yes
- Max. print speed: 180 mm/s
- Layer resolution: 0.1 – 0.4mm (100-400 microns)
- Connectivity: SD card reader
- Packing type: Unassembled Kit
Features
- Simple leveling method
- Stable power supply
- Oversized nuts design
- Easy to remove
- Humanized design
Unboxing

The Creality Ender 3, like its predecessor before it, is a rather compact 3D printer and the packaging it comes with is proof of that. For a semi-assembled machine with a modest build volume, it came in quite a small box.
On opening the box, you’ll find every tool and part tucked neatly away in packing foam. Apart from the parts of the 3D printer – which we’ll treat in detail in the next section – the Creality team also included the following tools in the box.
- Nozzle cleaner
- USB stick
- Zip ties
- Various tools like hex keys, wrenches, and a small screwdriver
- A sample of White PLA filament
- Spatula
- Wire cutters
- Assortment of nozzles
Specifications

- Brand: Creality3D
- Type: DIY
- Model: Ender – 3
- Product weight: 6.9000 kg
- Package weight: 8.9000 kg
- Product size: 44.00 x 44.00 x 46.50 cm / 17.32 x 17.32 x 18.31 inches
- Package size: 59.50 x 49.50 x 16.50 cm / 23.43 x 19.49 x 6.5 inches
Package content
- 1 x 3D Printer,
- 1 x Plier,
- Nozzle x 1,
- SD Card x 1,
- 2 x Pneumatic Fitting,
- 1 x Cable Tie,
- 1 x Blade,
- 5 x Allen Key,
- 1 x Needle,
- 2 x Wrench,
- 1 x Screwdriver,
- 1 x Rack,

For a 3D printer that costs slightly more than $200, it was quite a surprise – and a pleasant one at that – to see the added accessories like new nozzle cleaner and nozzle that came with the package. Once you’re done an unboxing, you can start with the anticipated process of assembling.
Assembly
Although the Creality Ender 3 is said to be a pre-assembled 3D printing kit, the truth is that you’ll need to carry out a fair bit of tinkering before you’ll have everything running just the way you like it. Unlike the Creality CR-10, which can be classified as a pre-assembled, the 3 takes more effort and time to put together. You’re better off calling the Creality Ender 3 a semi-assembled machine as opposed to a pre-assembled one.

The entire assembly process is documented on a small pamphlet that is included in the printer package. The process is written in 12 steps. While it seems easy enough to follow, some of the levels don’t have enough detail or explanation, which made the build time longer than it should initially have. If you take into account the time for assembly and bed leveling, the entire process should take a novice user about 1 – 2 hours to complete.
We’ve broken down the assembly process into the following sections to make things easier. The first section is frame assembly, followed by X-axis assembly. This is followed by belt installation, machine assembly, and finally, wiring.

The first step is to put the frame together using the pair of 40×40 aluminum extrusion pieces. These are fastened to the frame by using two pairs of screws on each side. A tip that can make this easier for you is to turn the base of the print on its front. The printer comes with pre-drilled holes in the bottom where you can mount the Ender 3 aluminum extrusions.
Screen:
The next step is to attach the LCD screen and the power supply box to the base. This is a simple act to accomplish and one that the instruction manual explained well enough. From here on, things get a bit more tricky, especially if this is your first time putting together a 3D printer.

Once you’ve added the power supply and LCD to the base, the next step is to install the Z motor and Z-limit switch to the frame’s left side. The Z-limit switch must – and this is important – be mounted precisely 32mm from the bottom of the base to the side of the vertical beam. If you attach the limit switch too high or too low, you’ll end up messing up the calibration process, which is why you need to pay close attention to what you’re doing. You may want to pull out a ruler for this aspect of the assembly as you need to be accurate as possible if you wish to a successful meeting.
Axis:
Next, attach the Z-axis Motor directly to a pre-installed bracket on the back of the left vertical beam. There is grease on the lead screw to act as a lubricant, so make sure you don’t remove any of it while carrying out the installation. You should also make sure that the bearings are loose when you’re installing as the rail won’t function properly if the bearings are too tight.

The next section to assemble is the X-axis. It can be a bit bothersome for some people, for a couple of reasons. The kit comes with two beams, which are the same dimensions. However, only one comes with six pre-drilled holes, and it is this beam you’ll need for the X-axis. If you get the beams mixed, you’ll end up staring at the instructions and wondering how to proceed. On the left mount, you’ll find the X-axis motor and the extruder motor. Also, there’s an odd Facebook QR code which doesn’t quite fit the Creality Ender 3 frame.
Creality 3D Ender 3:
If you start at the open side of the X-axis beam, you’ll need to position the wheels at the top and bottom so you can slide the gantry into place. The wheels should slide smoothly back and forth on the rail. If there’s friction or drag when pushing, it means that the wheels were not situated. You’ll need to adjust the eccentric nut behind the bottom wheel until it falls back into place. Once your X-axis has been assembled, the next step is to join the mounting bracket and belt tensioner. Both items are installed on the right side of the beam.

By now, your 3D printer should be taking form, but first, you’ll need to install the GT2 belt on the X-axis. At the ends of the pre-measured strap are gold clamps, which need to be positioned into the notches below the extruder carriage.
Installing the belt onto the Creality Ender 3 Pro requires that you carefully roll the extruder carriage over the belt. This will then slide the strap under the wheel, and into space. Repeat this process for the second wheel, making sure to position the other end of the strap underneath the carriage. Both ends of the X-axis have a pulley where the belt can wrap around, which will ensure the extruder moves smoothly.
The last step is to put all the pieces together and mount the filament holder on top of the frame. The Creality Ender 3 manual is more than enough to get you through the assembly process. Nevertheless, you can find a couple of YouTube assembly videos that’ll help you reduce mistakes and speed up the entire process.
Electrical System

One thing that is a significant concern on most budget 3D printers from China are the electrical components. Fortunately, there is much improvement in the Ender 3. It comes with a 24V switching power supply, which is compliant with the RoHS, CE, the FCC, and comes with a couple of factory certifications. There are thick power cables that connect to the main board via robust XT60 connectors. One thing you can say for Creality is that they learn from their past mistakes. This time they made sure to implement proper strain relief on the heated bed wires, which was an upgrade to those on the CR-10 that later led to all sorts of problems.

As for the printed board, it’s quite difficult to discern anything specific from the electronics. They were just labeled as a product of…


